

The Maw of Lorkhaj is a 12-man trial in Elder Scrolls Online and is currently Elder Scrolls Online's hardest content. It is located in Reaper's March and requires the Thieves Guild DLC. Within the temple, groups of twelve battle through a series of challenges and ultimately face Rakkhat. Trials are special PvE group instances in Elder Scrolls Online, which can be identified by the trial-eso-dungeon icon. They have special mechanics and group tactics for 12-player groups to accomplish, and present unique rewards for players. This walkthrough will be focused on how to achieve success on Veteran Mode. Note: there is an additional Hard Mode option for final boss. This will be added at a later date.
"With both Normal and Veteran difficulty modes, the Maw of Lorkhaj will test your allies and your courage. Breach the gates of an ancient Khajiiti shrine, and confront the ghostly legions of Namiira in eerie lamp-lit corridors - complete with ruthless new enemies, terrifying bosses, and a wealth of treasure from the depths of Oblivion."
Maw of Lorkhaj Information
- Location: Reaper's March
Achievements
- Maw of Lorkhaj Completed - Drive the dro-m'Athra back to the void and close the Maw of Lorkhaj in Normal Mode.
 Abyssal Beryl
 - Maw of Lorkhaj Conqueror - Defeat Rakkhat, Fang of Lorkhaj and his legions of dro-m'Athra in Veteran Maw of Lorkhaj while the Trial is scaled to Champion 160.
Dro-m'Athra Skin - Maw of Lorkhaj Difficult Mode - Defeat Rakkhat after empowering him at the lunar shrines in Veteran Maw of Lorkhaj while the Trial is scaled to Champion 160.
- Maw of Lorkhaj Fang Flcused - Defeat Rakkhat in Veteran Maw of Lorkhaj while the Trial is scaled to Champion 160, with at least three dro-m'Athra Dreadstalkers still alive.
- Maw of Lorkhaj Moons' Champion - Complete all achievements related to defeating Rakkhat, Fang of Lorkhaj in Veteran Maw of Lorkhaj while the Trial is scaled to Champion 160.
Title: Dro-m'Athra Destroyer - Maw of Lorkhaj Shadow Slayer - Defeat 25 Void Callers in the Maw of Lorkhaj.
- Maw of Lorkhaj Spotless Triumph - Complete Veteran Maw of Lorkhaj while the Trial is scaled to Champion 160 without suffering a group member death.
- Maw of Lorkhaj Stainless Souls - Defeat Rakkhat without anyone dying while afflicted by the Breath of Lorkhaj.
- Maw of Lorkhaj Two Moons Dance - In Veteran Maw of Lorkhaj scaled to Champion 160, force Rakkhat into his final phase within two lunar cycles, then defeat him.
- Maw of Lorkhaj Unchained Ambush - Use both chain switches within ten seconds in Veteran Maw of Lorkhaj while the Trial is scaled to Champion 160, then defeat the dro-m'Athra invaders.
- Maw of Lorkhaj Void Avoided - Defeat Rakkhat in Veteran Maw of Lorkhaj while it is scaled to Champion 160, with a maximum of two players ever being afflicted by the Breath of Lorkhaj.
- Time Trial Maw of Lorkhaj - Complete Veteran Maw of Lorkhaj while it is scaled to Champion 160 within a time limit of 40 minutes. Your trial begins when you cross the threshold of the Temple of Seven Riddles.
Bosses
- Zhaj'hassa the Forgotten
- Vashai and S'kinrai
- Rakkhat
Elite Enemies
- Dro-m'Athra Dreadstalker
- Dro-m'Athra Savage
- Dro-m'Athra Shadowguard
- Dro-m'Athra Sun-Eater
- Ogre Brute
- Ogre Flesh-Render
- Ogre Shaman
Normal Enemies
- Various Cursed Monks
Set Drops
- Lunar Bastian
- Moondancer
- Roar of Alkosh
- Twilight Remedy
Quests
- Into the Maw
Maw of Lorkhaj Maps
Main Map

Hallway

Suthay Sanctuary
The High Lunarium
Walkthrough & Strategies
 Maw of Lorkhaj Trial
The Maw of Lorkhaj Trial quest begins when you enter the door at the end of the first hallway. There are four bosses the team has to battle during the trial: Zhaj'hassa the Forgotten, a large Dro-m'Athra; Vashai and S'kinrai, two large Dro-m'Athra; and Rakkhat, a Grievous Twilight.
Maw of Lorkhaj Recommendations
All Group Members
- CP rank 531> for Veteran and Hard Mode
- 18k Health
- Appropriate gear for group buffs (Ebon, Spellpower Cure) and damage buffs (Aether, Alkosh, Moondancer, Twilight, etc.)
- CP 150+ food
- Potions geared to magicka or stamina based character (weapon damage, spell critical and/or spell power)
- Soul gems
- Personal shields
- It's imperative that both healers run the Cleanse skill, as the dreadstalkers will throw a dot on random players throughout the entire dungeon
Class Ultimates
- Nightblade Ultimates: Veil of Blades, Shooting Star
- Sorcerer Ultimates: Shooting Star, Energy Overload, Suppression Field
- Dragonknight Ultimates:
- Tank: Aggressive Warhorn, Magma Shell, Barrier
- DPS: Shooting Star, Dragonknight Standard, Dawnbreaker
- Templar Ultimates:
- Healer: Aggressive Warhorn, Solar Prison, Barrier
- DPS: Shooting Star, Solar Prison
Group Composition
- 1 tank on normal mode
- 2 tanks on vet and hard mode
- 2 healers
- 10 dps: maximum of 4 melee
Maw of Lorkhaj High Level Walkthrough
Before entering the trial, the trials leader will divide the raid into 2 groups, 6 each (1 tank, 1 healer, 1 Mag DK, 3 DPS) due to the fact that the second boss is actually two boses that need to be killed within 20 seconds of each other. It's important to understand before you begin that there are many strategies to use to battle through the trial. Each successful group will determine their own preferred way, so be sure to clafify in advance the strategies used if you will be running with different trial leaders.
Every trash mob will have some or all of the elite enemies. If the Dro-m'Athra's spawn, they need to be killed in this order:
- Sun-Eater (Mage), to eliminate the Eclipse Field negate
- Dreadstalker (Nightblade), to elimiate the Ruthless Salvo (arrow spray) and Marked for Death (the longer the Mark is up the more Panthers will spawn; to a maximum of 4 per Archer)
- Shadowguard, to eliminate Void Rush
- Savage, to eliminate the AOE slam attack that debuffs any players Physical Resistance
- Ogres: Shaman, Flesh renderers, Brutes
The tanks will need to split the Elite enimes during mob fights as follows:
- Main Tank: Shadowguards, Dreadstalkers & Ogre Renderers
- Off Tank: Savages, Ogre Shamans, Ogre Brutes & Sun-Eaters
Synergies need to be constantly available for both Tanks using Alkosh, so everyone needs to be using as many synergy skills as possible, such as shards, orbs, liquid lightening, etc.
First Area
You will encounter a small mob pack of conjured monks, the easiest enemies, who will appear alongside the elite enimies throughout the trial. Next, a Sun-Eater, Shadowguard and a Dreadstalker will spawn.
Kill the Sun-Eater laying down pre-damage and dropping ultimates as soon as it appears. Move to he Dreadstalker, who the tank has facing away from group. Then kill the Shadowguard.
Second Area
Go throught the door on the left and up the stairs. Lay pre-damage in front of the stone archway to the right, as the Sun-Eater will spawn here. Next, kill the two Dreadstalkers, which the tank will taunt at the top of the hill. Finally, kill the Shadowguard, which the other tank will have brought to the bottom of the hill away from group.
Head up the hill and get ready for the final mob before the first boss fight. Kill the Elite enemies in the way and same order as above, with the tanks splitting the Shadowguard away from the Savage.
Zhaj'hassa
Before you start the fight, notice the cleanse pads around the room (refer to the second bullet below for cleanse strategies). One healer and one Magicka DK will be on each side of the boss. To start the fight, the tank will pull taunt the boss in the middle of the room and pull him slightly towards the right hand wall (as you enter the door) to be positioned in between the first two cleanse pads. The melee players will be the closest to boss, in a loose stack around him, leaving enough room between players that curses won't spread. The range DPS will be in a loose stack around melee players, again with enough room that curses won't spread. The off-tank will be positioned to the right of the main tank, far enough away as to not spread curse. Healers will be positioned one on each side to be able to keep all playes in healing springs range.

Zhaj'hassa has 4 Main Mechanics:
- Panthers: Summons Sar-m'athra Panthers. 2 at 80%, 3 at 60%, 4 at 40% and 5 at 20%. Unable to be taunted, the Mag DK's will pull chain the panthers into the boss and use talons, so DPS can kill with AOE attacks. Off-tank will assist as needed with pull chain and talons.
- Curse: Places a red AOE circle below 3 random players. Any players in the AOE will be cursed. If other players are too close to those cursed, they will also get the curse. Use the cleanse pads around the room to cleanse. The cleanse pads have a respawn timer of around 25 seconds. One strategy is to assign players to pads, with tanks and melee players sharing the two pads closest to the boss, healers and Mag DK sharing the next cleanse pads, and all other DPS sharing the remaining 4 cleanse pads. The other strategy is an 'A' and "B" side approach, with A being the 3 pads left of tank (based on position indicated above) and B being pads right of tank. With only 3 players being taunted each curse round, there should always be a cleanse pad available.
- Pillars: Summons Void Pillars on a random player who is far from the Boss, so it is crucial during the entire fight for all DPS to remain in their loose stack close to the boss without stacking curses. A double red circle will indicate a pillar is spawning. If you are the person the pillar spawns on, you can block to prevent yourself from being knocked to the ground. Never stand on a cleanse pad to wait for it to spawn. It is better to die in place than to spawn a pillar at the back of the room, or so close to the wall that no-one can get behind it. The longer the fight lasts, the fewer pillars will spawn. After 5 pillars spawn, everyone needs to stand behind a pillar during Cataclysm or you will die. Standing behind the pillar will save you from the explosion.
- Shield: Summons a Shield, one at 70% and a larger Shield at 30%. It's important that all DPS be alive when this phase starts. Everyone will move closer to the boss and to each other, being careful not to overlap the circles underneath their feet. The shield must be destroyed before the damage done by the shield becomes too much for the healers to heal through. If the shield isn't destroyed within a few seconds, it will begin to pulsate faster. Healers will maintain healing springs and alternate dropping nova. DPS can block cast to mitigate damage even more.
Be sure to loot the boss before moving through the door. In the passthrough room to the next area, you will find heavy sacks and chests to open.
Third Area
In the next area you will encounter more elite enemies. The first wave will be Ogres, with the second wave being Banners. Kill the enemies taking care for tanks to split the elites as indicated earlier and for DPS to target in the order listed above. Continue down the path, taking care of all elite enemy groups, with tank and off tank taunting their respective elites.
Once you reach bototm of hill, there will be 5 waves of elites that spawn. NOTE: If the group wipes at any time, you will have to start the entire elite mob fight from the beginning. All DPS and main tank will run into the cave to the left to DPS elite who spawn there, while the off tank taunts the Ogres who spawn in middle of the area, off to the side. Off tank will then pull Ogres over to where the DPS just came down from upper hill, meeting main group there to kill the Sun Eater as soon as it spawns. Ogres will be killed with AOE damage. After Sun Eater is killed, off tank will move towards door to far right of area taunting new designated elites which spawn there, while the rest of the group targets the banner elites in order as described above. Main group will then move to off tank to kill remaining elites and to be ready for next Sun Eater to spawn. When banner elites spawn again, tank and off tank will once again pull respective enemies apart from each other. Once you kill the final elites, the gates to next area will open and you can loot the chest.
Vashai and S'kinrai
Split into the two groups as discussed at beginning of walkthrough, with each side noting the boss that is on their side. Each time there is a room split, all players will need to quickly return to their original bosses, whatever side that might be. To start the fight, all players will lay down pre-damage on the right side, where Vashai will initially be taunted. The reason for this, is that typically S'kinrai takes more damage during the fight, as his mobs spawn close to him so it's easier for the DPS to continully damage him and mobs together. Vashai's mobs spawn far away from him, hence pre-damage at beginning of fight, as well as all DPS on him during Prayer Phase is necessary. After pre-damage is laid down, both tanks will then taunt their respective bosses and players will then split into their two groups, with left side players continuing to do distance damage to Vashai (who is on the right side) until the first mechanic, Color Change, described below.
The twins fight has 4 main mechanics:
- Color Change: At the start of the fight 6 people will recieve the Holy (light) Aspect and 6 people the Shadow (dark) Aspect. If you stand too close to a player of the opposite Aspect to your own, you will both explode. As soon as the Color Change happens, the Tank and Off-Tank will taunt the boss with the opposite color head, pulling the bosses each to their side, allowing players to DPS the boss at a safe distance from the players with opporite color head. At this time, all players must switch from DPSing Vashai to DPSing the boss with the opposite color head. This means the left side will now be DPSing Vashai and the right side will be DPSing S'kinrai.
- The Rage of Skinrai and the Will of Vashai: Light and Dark mobs spawn in waves starting with 1 enemy on each side, increasing in numbers the longer the fight progresses. When the enemies spawn, you will hear an explosion. The Magicka DK in each group needs to chain pull the enemies with the same color head as their Boss so the group can AOE the enemies down quickly. Chain pull, Deep Breath. Chain Pull, Deep Breath. S'kinrai's mobs will cast the "Lunar Flare" skill on up to 4 players in their field of view, which can be purged. They also cast the "Lunar Destruction" skill, which is similar to the Templar "Radiant Destruction" skill. This should be interrupted by bashing or with the DK "Deep Breath" skill. Vashai's mobs throw 3 Void Orbs that do more damage the further they travel. The DK must stand between them and the wall, keeping them facing away from the group, or pulling them close enough to the tank so the tank can taunt them and prevent them throwing orbs into the opposite group, where they will do a lot of damage.
Not long after this phase begins, another Color Change will occur affecting 3 players on each side. If you have combat text turned on, you will see 'conversion imminent' text on your screen, along with a glowing circle under your feet. You only have a few seconds to get away from your group. Each group of 3 players must move clockwise away from their original group and towards the opporsite group, to prevent players from getting too close to each other. Players then must DPS their 'new' boss until the next mechanic. When one healer is affected by this Color Change and the other one is not, that healer will need to heal their original group from a distance, usually on the same side of the candles as the new head color group, but in the center of the room so spells can reach the original group. - Prayer Phase: Vashai and Skinrai will teleport to a random side of the room and the floor will glow half light and half dark. The group must run quickly to the boss with the opposite color head (and floor). (Some groups run clockwise, others run counterclockwise). If you don't make it across the candle line to the opposite color room in time, you will die instantly.
A few seconds after Prayer Phase, the color above all player heads will dissappear and each player must return to their original boss immediately, running straight through the center of the room. If there happen to be people dead during this phase, hug your original color boss so that you will not randomly get the opposite color head.
Now it's rinse and repeat. The Tank and Off-Tank will taunt the boss with the opposite color head to bring the boss to their group. Players will DPS, mobs will spawn (remember, one more each time this phase happens, if you get to the point where 5 spawn on each side, the team will wipe) 3 player color change will happen, prayer phase and then returning to their original boss. Repeat untl one boss is killed. When the twins are both under 20% health, the raid leader will make the call of whether to execute one of the twins and ignore adds, or to go another round of killing adds before executing. If the call is to ignore the adds, the Mag DK's will chain all of the mobs away from the group and use Deep Breath as much as possible. All DPS will focus on the twin called for execution, taking care to remain away from players with the opposite color heads. Healers will use the Barrier Skill when needed to mitigate the massive damage output of the mobs. - Simultaneous demise: Once one of the twins dies all players will lose the colors on their heads and a timer begins. The remaining Boss will teleport to the center of the room and after 20 seconds it will explode with nowhere to hide and all are killed. This means both Bosses must take very similar damage during the fight to avoid one Boss dying far too early.
After defeating the twins, loot the chests and heavy sacks in passthrough room and head to next area.
Fourth Area
Go through the gate, making sure no one gets left behind as the gate will close. Players can get through the gate after closing, but it may take a few tries to get the Open Gate prompt. Once inside, you will see giant panthers, which cannot be taunted. Everyone should mount up and upon trial leader command, start riding around in a circle together. As soon as each panther "marks" a player for death, everyone can dismount and begin DPSing the Panthers. The players who are marked need to run from the panthers so as to not be caught. After 30 seconds, both panthers will mark another player. The group will just follow the same instructions above until both panthers are killed.
Next are multiple waves of Banner enemies which will begin with the pull of a chain. There are two chains to pull, both at the top of the right and left paths. Unless you are going for the achivement to pull both chains at once, only pull one chain at a time. Note that if the group dies during this phase, it will begin all over again.
Left Side Chain
- The first Wave will have the folowing banner enemies:
- Sun-Eater – DPS will throw pre-damage to the back before the Sun-Eater spawns
- 2 Dreadstalkers – Should be taunted by one of the tanks to face them away from the group
- Savage – Should be taunted by one of the tanks and pulled away from the group
- Sun-Eater – DPS will throw pre-damage to the back before the Sun-Eater spawns
- The second Wave will have the following banner enemies:
- 2 Sun-Eaters – DPS will throw pre-damage before the Sun-Eaters spawn and focus on killing one at a time to minimize the change of two Eclipse Field negates being on the ground at the same time
- 2 Shadowguards – Should be taunted away from the group by one of the tanks
- Savage – Should be taunted by one of the tanks and pulled away from the group until all of the other enemies are killed
- The third Wave will have the following banner enemies:
- A Dreadstalker and 2 Shadowguards will spawn a few seconds before the other Banner enemies, so all DPS should lay down pre-damage before they spawn. The Shadowguards sould be pulled away from the group by one of the tanks before the Sun-Eaters spawn
- 2 Sun-Eaters will spawn again, use same strategy as above
- Savage – Should be taunted by one of the tanks and pulled away from the group until all of the other enemies are killed
Right Side Chain
- The first Wave will have the folowing banner enemies:
- Sun-Eater – DPS will throw pre-damage to the back before the Sun-Eater spawns
- Dreadstalker – Should be taunted by one of the tanks to face them away from the group
- Shadowguard – Should be taunted away from the group by one of the tanks
- Savage – Should be taunted by one of the tanks and pulled away from the group until all of the other enemies are killed
- Sun-Eater – DPS will throw pre-damage to the back before the Sun-Eater spawns
- The second Wave will have the following banner enemies:
- Sun-Eater – DPS will throw pre-damage to the back before the Sun-Eater spawns
- 2 Dreadstalkers – Should be taunted by one of the tanks to face them away from the group
- 2 Shadowguard – Should be taunted away from the group by one of the tanks and killed after all of the other enemies are killed
- Sun-Eater – DPS will throw pre-damage to the back before the Sun-Eater spawns
- The third Wave will have the following banner enemies:
- Dreadstalker, Shadowguard & Savage – These enemies will spawn a few seconds before the rest of the enemies so all DPS should lay down pre-damage before they spawn. The Shadowguard and Savage should be pulled away from the group by one of the tanks before the Sun-Eaters spawn.
- Sun-Eater & 2 Dreadstalkers – DPS drop all Ultimates on the Sun-Eater and one of the tanks will taunt the Dreadstalkers to face them away from the group
- Dreadstalker, Shadowguard & Savage – These enemies will spawn a few seconds before the rest of the enemies so all DPS should lay down pre-damage before they spawn. The Shadowguard and Savage should be pulled away from the group by one of the tanks before the Sun-Eaters spawn.
Once all enemies have been killed, proceed up the hill to open the chest and into the next area, to battle more waves of Banner enemies.
Fifth Area
The next room is long and narrow. Here you will battle three waves of Banner enemies and Cursed Monks which will drop down from above with an AOE that does massive damage. This can be mitigated if Caltrops is continually thrown in the area. Someone in the group will get the 'Mark of Death" placed on them by the Dreadstalker, making all panthers target you. Player should run around the outside of the room to pull all panthers away from the rest of group.
- Wave 1
- Sun-Eater – Will spawn on the right-hand side of the room against the wall, about mid-way down. All players should immediately run here and lay down pre-damage before the Sun-Eater spawns.
- Dreadstalker – Spawns on the far left-hand side of the room. Should be taunted by one of the tanks to face them away from the group.
- Shadowguard – Should be taunted away from the group by one of the tanks, across the room from the other tank who has the Savage
- Savage – Should be taunted by tank who has the Dreadstalker and pulled away from the group until all of the other enemies are killed. Tank should stand at the end of the room, mid-way between walls.
- Sun-Eater – Will spawn on the right-hand side of the room against the wall, about mid-way down. All players should immediately run here and lay down pre-damage before the Sun-Eater spawns.
- Wave 2
- 2 Sun-Eaters – The first Sun-Eater will spawn on the left hand side, against the wall. All players should DPS the Sun-Eater over any other Banner enemies still alive, or just spawning. After the first Sun-Eater is dead, the second one will spawn on the right hand side of the room.
- 2 Savages – Tanks should split taunting the Savages and pull to different sides of the room
- 2 Sun-Eaters – The first Sun-Eater will spawn on the left hand side, against the wall. All players should DPS the Sun-Eater over any other Banner enemies still alive, or just spawning. After the first Sun-Eater is dead, the second one will spawn on the right hand side of the room.
- Wave 3
- 2 Sun-Eaters – Will spawn both at the same time. One on left and one on right-hand sides of the room. DPS should kill the one on the right hand side first, then move quickly over to the left side.
- 2 Dreadstalkers – One will spawn close to the entrance and the other close to the exit. Both should be taunted by one of the tanks close to the exit door.
- Shadowguard – Should be taunted away from the group by one of the tanks, across the room from the other tank who has the Savage
- Savage – Should be taunted by tank who has the Dreadstalker and pulled away from the group until all of the other enemies are killed. Tank should stand at the end of the room, mid-way between walls.
- 2 Sun-Eaters – Will spawn both at the same time. One on left and one on right-hand sides of the room. DPS should kill the one on the right hand side first, then move quickly over to the left side.
Head through the passthrough room to once again loot the chests and collect items from heavy sacks, then proceed into the final room for the Rakkhat fight.
Rakkhat
The High Lunarium room is divided into two main areas: one large inside room and one outside area, called the backyard. Before starting the fight, the trial leader should assign pads to all DPS (1-8) for the lunar phase. Typically you would alternate range and melee DPS with the backyard players assigned to pads 1 and 8. The trial leader should designate two players and one backup to run the outside (Backyard) area, which will happen a few times during the fight. Players who run the Backyard will receive the Shadow Debuff and will need to cleanse each time after they travel back through the door to the main area, on one of 4 cleanse pads in each corner of the main area.
There are two items of note: Each time one of the pads turns gold, the first player who stands on the pad will receive a Lunar Bastion Buff, giving them reduced damage from Rakkhat and other mechanics. Therefore it's important that only the main Tank steps on the pad first. After the light goes away from the pad, it will be replaced by a dark blue glow, which indicates the Shadow Defuff is now active on that pad. Anyone who steps on the pad will receive a healing debuff, reducing health. Therefore it's important that none of the DPS ever step on the pads when they are blue, as it will force them to have to die, as there are no cleanse pads avaialbe for DPS, only the Backyard runners. Any deaths in this fight mean a significant loss of DPS and can affect success.
Rakkhat's 5 main mechanics are:
- Backyard: The area behind the Dark blue portal.
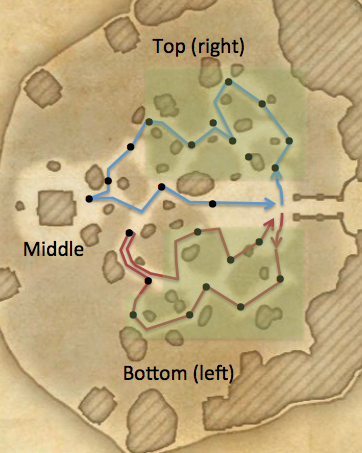
During the figtht, the first Hulk will spawn and Rakkhat will slam the ground. You will see 6 shadows appear in the center pad indicating it's time for two players to enter, expose and kill the 6 Dro'mAthra Shadows which are hidden in the Backyard: 2 in the top area 2 in the left area, and two in the bottom area of map. The two runners will split the area and run the path indicated above (note that this only one suggested path), stopping at each carpet and hitting the synergy to explose the Dro'mAthra Shadow, if it is there. Each Dro'mAthra must be killed before the player moves onto the next carpet location. Once the player has exposed 2 Shadows in the top, bottom or middle, they can skip the rest of the carpets in that area and move directly to the next area. Note: Sorcerers are great as runners, as they can use the Boundless Storm skill, which will accelerate kills and also get them around the room faster. Once all 6 Shadows have been exposed and killed, the 2 runners will come back through the portal, cleanse and begin DPSing the boss until the next set of Shadows appears. Rinse and repeat. Note: the cleanse pads will not respawn until after lunar phase, which means if the team's DPS isn't high enough to kill Rakkhat prior to Lunar Phase, the Backyard runners will need to alternate cleansing, dying and cleansing. Note: there is a timer on the shadows which appear in the center of the room. If they aren't exposed and killed in the backyard prior to the shadows in the main room sinking into the ground, the entire team will die and you have to begin the fight again. - The Hulk: Rakkhat's main elite enemy, which will spawn 3x prior to Lunar Phase. The off-tank should taunt the Hulk as soon as he spawns, as he will throw a debuff similar to Shattered Armor on his target. After 2 debuffs have been thrown, the main tank will taunt the hulk once to receive the next debuff then the off-tank will taunt him back. If there is no handoff, the off-tank will usually die.
- Orbs: There are three types of Orbs in the fight, and the type will depend on what phase of the fight you are in.
- Void Combustion - Through Pad 4. A red AOE will appear under a player's feet, indicating they should immediately move away from the group, preferrably in a corner which faces away from the group. The orb will explode, shootting out mini-orbs which will insta-kill other players if they are too close.
- Stalker Orbs - Pads 5 & 6. Floating blue orbs will appear causing a dot affecting 1-2 players at random. The affected player must move away from the group (making sure not to pull the orb through the group). The closer the orb gets to a player, the more damage it will do.
- AOE Orbs - Pad 7. Red circles will spawn under a group of players feet and after 1 second, orbs will appear and deal damage to anyone who is still standing where the red AOE spawned. The DPS players should move together as a group to one side or the other to get out of the red AOE areas and to not affect the tanks close to the boss.
- Lunar Phase: Pad 8. Rakkhat will slam pad 8 and then will rise up into the air. All pads will turn gold indicating they all now have the Lunar Bastion Buff.
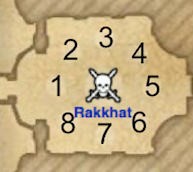
All DPS players must immediately go to their respective positions and begin attacking their elite enemy. 2 players will DPS elite enemies together. If the two players are both ranged DPS, they will just stand on their pads the entire Lunar Phase. If one player is melee and one ranged, both players will DPS the elite on the melee pad first, then the 2 players will roll dodge, swapping pads, allowing the melee to DPS the second elite. Players will work together based on these pad numbers: 1 & 2, 3 & 4, 5 & 6, 7 & 8.
The Tanks will position themselves on the center pad at the 12 and 6 o'clock positions (based on when you first enter the room), while the Healers will position themselves at the 3 and 9 o'clock positions. Healers will throw breath of life as needed until a synergy appears. One strategy is for the tanks to synergize pads 1 and 5 first, and when the elite is killed move to synergize pads 2 and 6. The healers will synergize pads 3 and 7 first, then move to pads 4 and 8.
When Lunar Phase is over, all of the gold pads will once again be dark and it will be as in the beginning of the fight, with pad 1 turning gold. Rinse and Repeat until Rakkhat is ready for execute. Note that any banner elites who were not killed during Lunar phase will need to be targeted and killed immediately when Lunar phase is over. - Execute Phase: When Rakkhat is DPS'd down to 11% health, he will move into the execute phase. The DPS players must be ready to move their respective pads as needed, starting with Pad 1. A Light Orb will appear which will be connected to Rakkhat. This orb casues him to take less damage, so it is imperative as soon as the orb spawns, the player assigned to pad 1 must immediately run across/roll dodge across the pad to collect the orb (not standing on pad) and then move to continue DPS'ing Rakkhat. Player assigned to pad 2 must now do the same for their pad, etc. All other players must focus DPS on Rakkhat until it's time for them to collect the orb on their pad. This will continue until Rakkhat is killed. Note: during this phase, all previous mechanics will be in play, including hulks spawning. Players must utilize their own shields, pay attention to the Orbs, etc. and Tanks will be taunting the hulks to keep them away from the group. Healers will be using Breath of Life and the Barrier ultimate as needed.